

Installing Dee Wan
This guide installs Dee Wan CMS into your own Cloudflare account. An installation is the admin Worker, the public read Worker, the admin UI on Cloudflare Pages, one control D1 database, media storage, and the credentials behind them. It is created once, has one claim link, and serves many sites (see the product vocabulary).
There is one installer engine with two interfaces:
- the web installer, a four-step wizard served from your own machine (
npm run install:web); - the command-line installer:
npm run setupfor an interactive run, andnpm run install:cms <verb>for planned, resumable and scriptable runs.
Both read and write the same configuration file, backend/wrangler.jsonc, and the same step
ledger, and both run the same list of steps that npm run plan prints.
Dee Wan 1.0 is pre-release. Installing against real Cloudflare is one of the acceptance gates that remain open. See the 1.0 product boundary for what is and is not covered.
Before you start
Section titled “Before you start”What you need
Section titled “What you need”- A Cloudflare account with Workers, D1, Pages, and R2 or Cloudflare Images.
- Node.js 22.14 or later on the 22 line, or 24.10 or later on the 24 line. The repository ships an
.nvmrc(24.18.1), sonvm useselects the right version. - npm exactly as
package.jsondeclares it (11.16.0), which is the npm that the.nvmrcNode ships with. - Git, to clone the repository with its submodules.
- Optionally, your own domain. To use it, the domain must be a zone in the same Cloudflare account.
Without one, the installation uses the addresses Cloudflare provides (
pages.devandworkers.dev). - Optionally, a DeepInfra API key if you want the AI features. You add it after installing.
Cloudflare Access (Zero Trust) is not required. Both installers offer it as an extra perimeter in front of the admin, and it is off unless you turn it on.
Get the code and install dependencies
Section titled “Get the code and install dependencies”git clone --recurse-submodules <repository-url> dee-wan-cmscd dee-wan-cmsnode scripts/install-dependencies.mjsAlways install dependencies with node scripts/install-dependencies.mjs, never with a bare
npm install or npm ci. It refuses any other npm version, extracts the locked dependency tree
with install scripts disabled, and then rebuilds only the packages whose scripts are approved.
A fresh clone needs no manual build step: setup, deploy and migrate:d1 build the packages and
the Prisma client if they are missing.
What gets created
Section titled “What gets created”These are the steps the installer runs, in order. npm run plan prints the same list for your
configuration, with the state of each step.
| Step | What it creates or does |
|---|---|
| Check Node and Wrangler | Checks only. |
| Resolve the Cloudflare API token | Checks only. |
| Choose the Cloudflare account | Checks only. |
| Preflight — token scopes, plan, existing resources | Checks only. Stops the run before anything is created if a check fails. |
| Create the control D1 database | A D1 database (default name dee-wan-cms-db). |
| Apply migrations to D1 | The schema, and the seeded roles and workflow. |
| Provision the private import archive bucket | A private R2 bucket for import archives. Only when you choose it. |
| Connect the initial site to its hostname | A public hostname for the initial site. |
| Build the admin UI | Builds only. |
| Deploy the admin UI to Pages | A Pages project (default name dee-wan-cms). |
| Deploy the admin Worker | A Worker (default name dee-wan-cms-backend). |
| Generate and store the session signing secret | A Worker secret. |
| Provision media storage | An R2 media bucket, or a Cloudflare Images binding. |
| Deploy the public API | The public read Worker (named after the admin Worker, with -public appended) and its hostname. |
| Generate and store the site-token signing key | A Worker secret on the admin and public Workers. |
| Attach the Worker route | A Worker route on your zone. Only with your own domain. |
| Point DNS at the deployment | DNS records under your domain. Only with your own domain and DNS setup turned on. |
| Put Cloudflare Access in front of the admin | An Access application and policy. Only when you turn Access on. |
| Check the deployment answers | Checks only. |
| Mint the first administrator’s claim link | A single-use link, shown once. |
Resources such as the Workers, the Pages project, the D1 database and the R2 buckets are billable Cloudflare resources in the account you choose.
With your own domain, the admin UI is served at cms.<your-domain> and the public API at
content.<your-domain> by default. Without one, the admin UI is served at
<pages-project>.pages.dev and the public API at
<admin-worker>-public.<your-workers.dev-subdomain>.workers.dev.
Choose an installer
Section titled “Choose an installer”| Web installer | Command-line installer | |
|---|---|---|
| Start with | npm run install:web |
npm run setup or npm run install:cms -- <verb> |
| Interface | A browser page on 127.0.0.1, served from your machine |
Terminal prompts, or no prompts with --yes |
| Cloudflare credential | Cloudflare sign-in (OAuth), held in memory for the session | An API token you create, from the environment, .env or the prompt |
| Needs | A Cloudflare OAuth application configured for this build (see below) | A Cloudflare API token with the listed permissions |
| Planning and scripting | Shows what will be created before you install | plan, --json output and fixed exit codes |
| Resume after a stop | Resume button | npm run install:cms -- resume, or run setup again |
The web installer’s Cloudflare sign-in needs a registered Cloudflare OAuth application. The
installer reads its client id from DEEWAN_CF_OAUTH_CLIENT_ID. Dee Wan 1.0 does not ship a
registered application, so unless you have one and set that variable, the Cloudflare step shows
“Cloudflare sign-in needs setup.” and tells you to run the command-line installer instead. You can
still walk through the wizard with npm run install:web:dry-run, which touches nothing.
Web installer
Section titled “Web installer”Start it
Section titled “Start it”npm run install:webThe server listens on 127.0.0.1 only, on port 8976 unless DEEWAN_INSTALL_PORT is set. It
prints one link:
Dee Wan installerOpen this link. It is bound to this session and is not written to disk:
  http://127.0.0.1:8976/?t=<session-token>
The token in the link is generated for this run. Every request must carry it, so another page or program on the same machine cannot drive the installer. A request without it gets “This installer is bound to one session. Open the link printed in the terminal.” Press Ctrl-C in the terminal when you are done.
Cloudflare sends the browser back to http://127.0.0.1:<port>/oauth/cloudflare after sign-in, and
that address must match the one registered with the OAuth application exactly.
DEEWAN_CF_OAUTH_REDIRECT overrides it.
The page has a Language selector with English, Thai, Russian, Spanish, French and German. The language you install in also becomes the default language of the first site.
The wizard has four steps: Site, Cloudflare, Administrator and Install. Continue saves the current step before moving on, and Back returns to the previous one.
Step 1: Site
Section titled “Step 1: Site”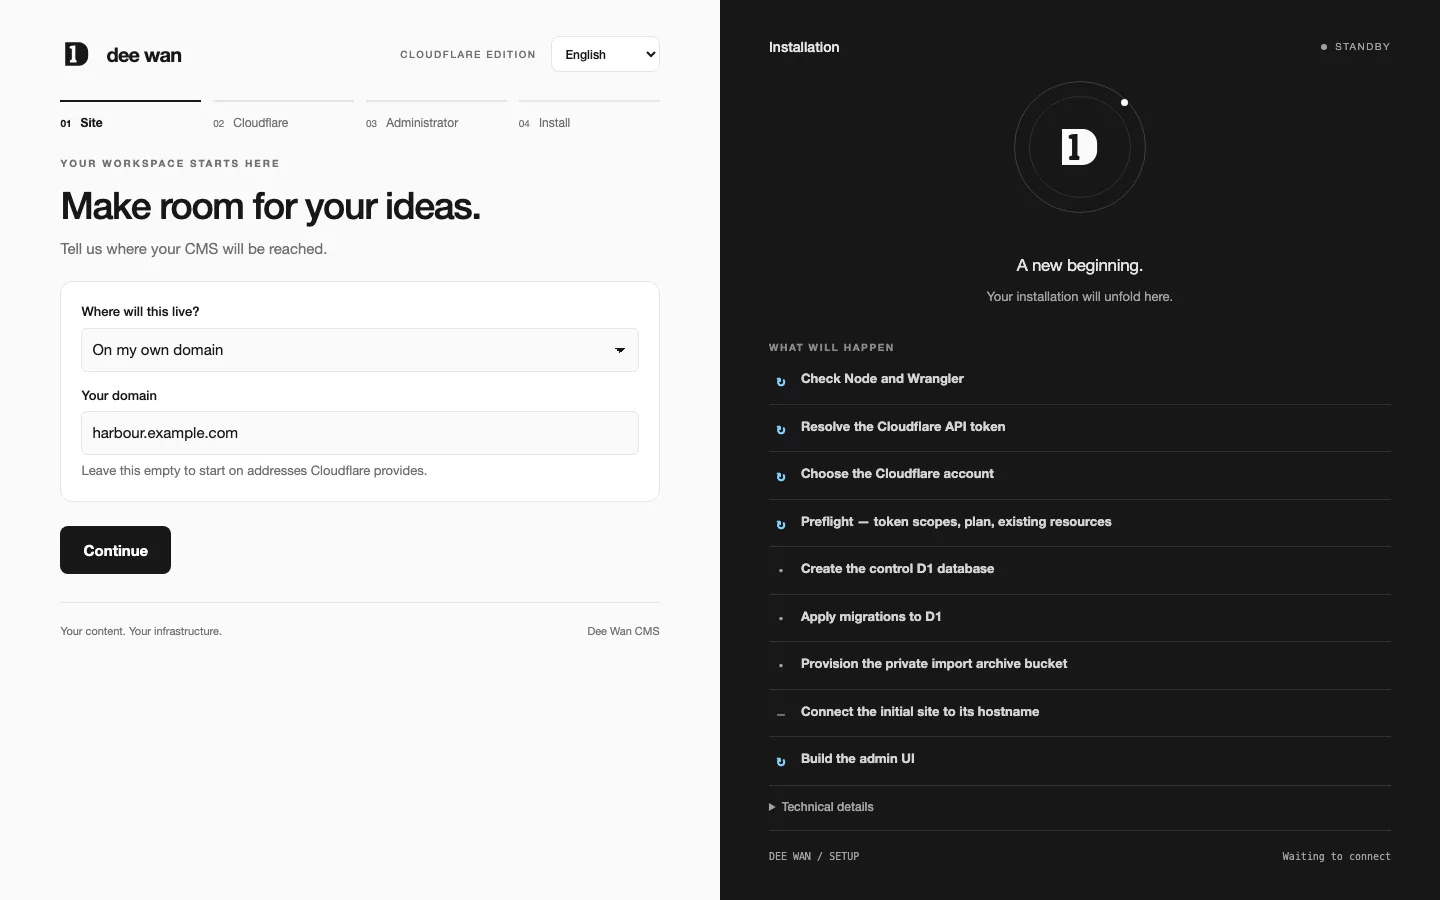
Where will this live? has two answers:
- On my own domain: enter it in Your domain, for example
example.com. - On addresses Cloudflare provides: leave the domain empty.
Nothing else is asked here. Infrastructure names and optional features have working defaults and are on the Install step.
Step 2: Cloudflare
Section titled “Step 2: Cloudflare”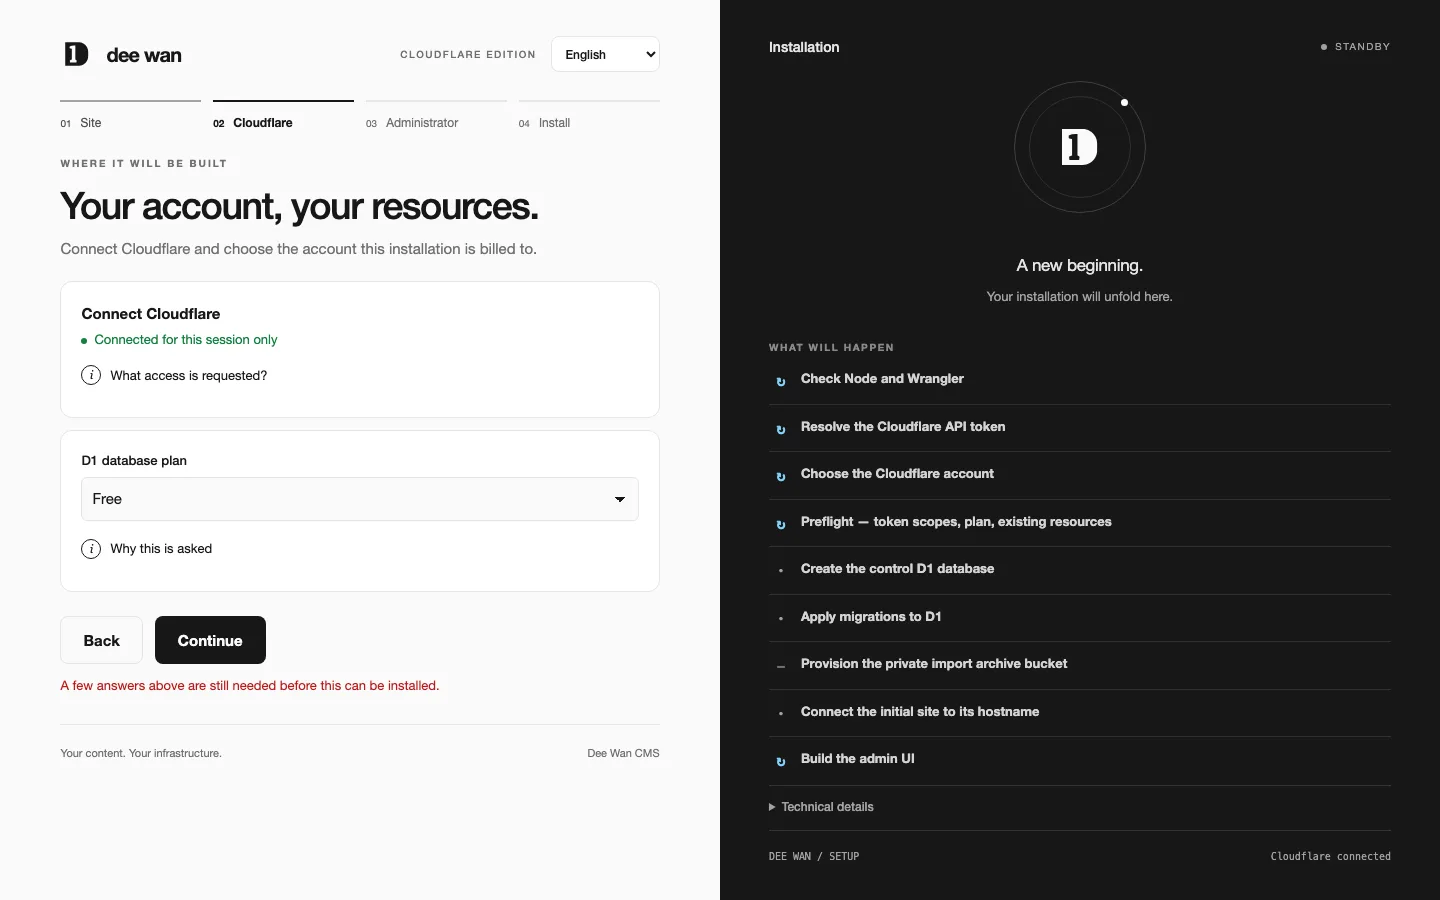
- Under Connect Cloudflare, choose Authorise Cloudflare. It opens Cloudflare in a new tab. The link is disabled while you have unsaved changes (“Save your settings before connecting.”).
- Approve the request. The tab then shows Connected and says the installer holds a Cloudflare credential for this session only. Close it and return to the installer, where the card shows Connected for this session only.
- Choose the account under Which Cloudflare account and select Use this account. If your sign-in reaches only one account, it is chosen for you. Everything the installation creates is billed to this account.
- Choose the D1 database plan: Free or Paid. Cloudflare publishes no way to read which plan an account is on, and the two plans allow different amounts of stored content, so the installer asks instead of guessing.
What access is requested? lists the exact Cloudflare scopes the sign-in asks for. They depend on your answers:
| When | Scopes |
|---|---|
| Always | account-settings.read, d1.write, workers-scripts.write, page.write, workers-r2.write |
| With your own domain | zone.read, workers-routes.write |
| With your own domain and DNS setup on | dns.write |
| With Cloudflare Access on | access.write, access-acct.read, access-service-token.write |
If you later change a setting that changes the access needed, the installer drops the old authorization and says “Saved. This changes what access is needed, so connect Cloudflare again.”
Continue is refused until Cloudflare is connected and an account is chosen.
The credential is held in the installer’s memory, not written to disk. If it expires, the page says “Your connection expired. Connect again to continue.” Authorising again does not affect anything already created.
Step 3: Administrator
Section titled “Step 3: Administrator”Enter one Administrator email. The first sign-in link (the claim link) is bound to this address, and only this address can claim the installation.
Step 4: Install
Section titled “Step 4: Install”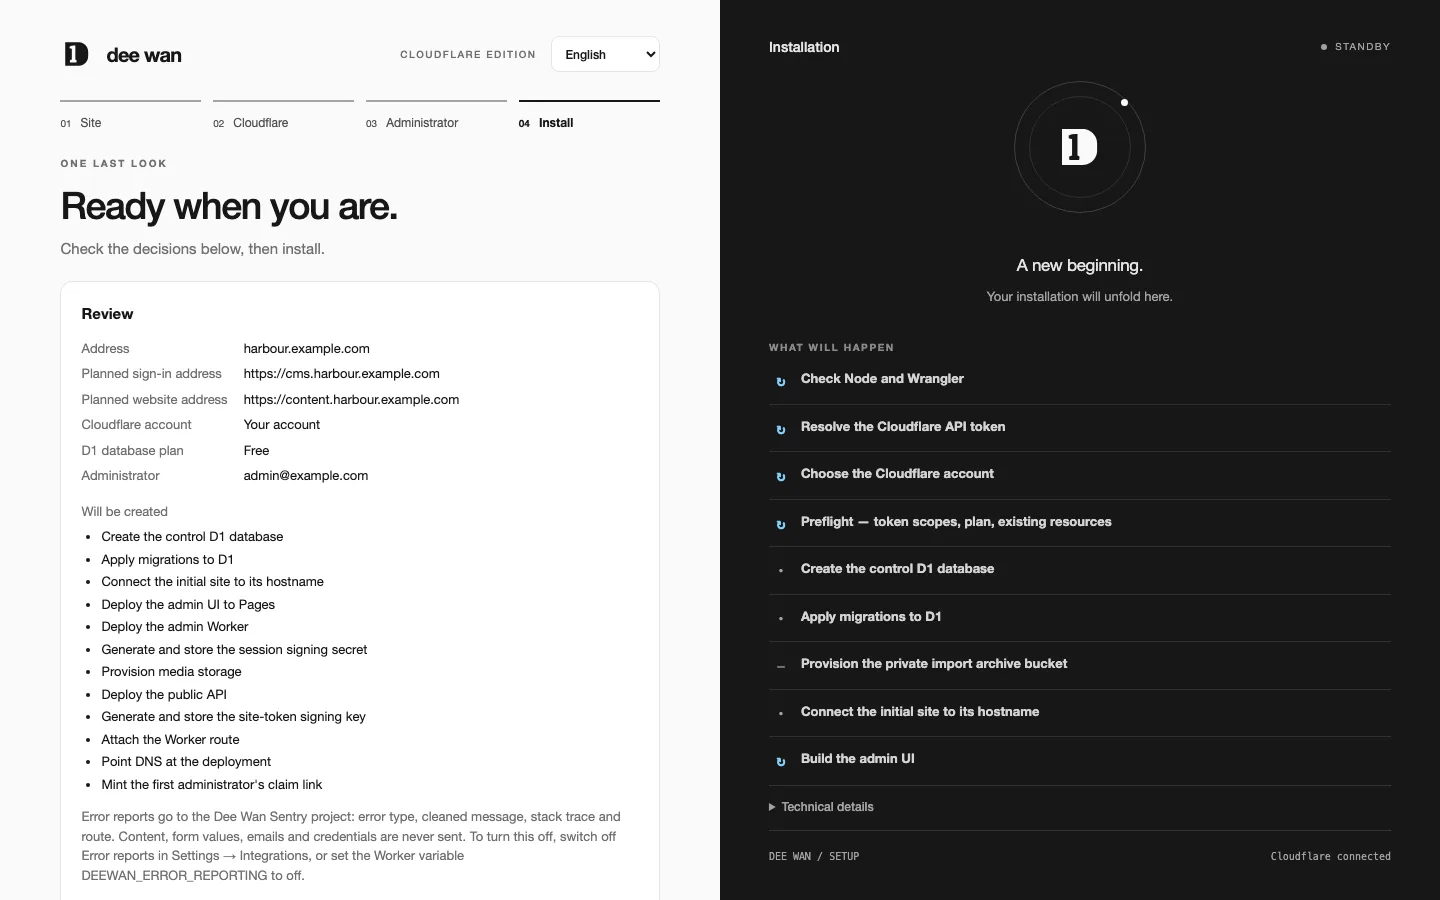
Review lists what you decided: the address, the Planned sign-in address, the Planned website address, the Cloudflare account, the D1 database plan and the administrator. Will be created lists every step that will create something and has not been done yet.
Customize infrastructure opens the remaining settings:
| Setting | Default |
|---|---|
| Where you sign in (admin subdomain) | cms |
| Where your website reads from (public API subdomain) | content |
| Point your domain at this installation | On. Needs your own domain. |
| Ask for a Cloudflare sign-in before the admin (Cloudflare Access) | Off. Needs your own domain. |
| Limit how often one visitor can read your content | Off. Needs your own domain. |
| Service name (admin Worker) | dee-wan-cms-backend |
| Project name (Pages project) | dee-wan-cms |
| Your workers.dev subdomain | Empty. Used for the public API address when you have no domain. |
| Seconds to keep website answers | 0, which shows every reader the newest content |
| Also prepare the archive bucket for importing from another system | Off |
The admin and the website need different subdomains. If you turn on Access, note the two warnings the page shows: every person you invite also needs an entry in the Cloudflare Access policy, and if the Access application is deleted or misconfigured, everyone is locked out. The visitor limit also applies to private reads, including a site build that reads from one IP address.
The review also states that error reports go to the Dee Wan Sentry project (error type, cleaned
message, stack trace and route; never content, form values, emails or credentials). You can turn
this off later in Settings → Integrations → Error reports, or by setting the Worker variable
DEEWAN_ERROR_REPORTING to off.
If you edit a setting on this step, the primary button becomes Save changes. Once everything is saved, choose Install.
The installer refuses to start a run against settings you have not reviewed. If the configuration file changed while the page was open, it says “The settings changed while this was open. Nothing was started. Review them and try again.”
What the web installer writes
Section titled “What the web installer writes”Each save writes your answers into backend/wrangler.jsonc (or the file named with --config)
and keeps any comments in it. If the file does not exist, a fresh one is created. Choosing an
account writes account_id. The file is gitignored because it holds your real values. The web
installer cannot edit a wrangler.toml configuration; convert it to wrangler.jsonc or use the
command-line installer.
The install run itself is the command-line engine: the page starts install:cms apply (or
resume) with --yes, passing the Cloudflare credential from your sign-in. It does everything
npm run setup does, including writing backend/wrangler.public.jsonc for the public read Worker.
Following the run, retrying and resuming
Section titled “Following the run, retrying and resuming”The panel beside the wizard shows What will happen before a run, Progress during it, and What was done when it finishes. Technical details shows the installer’s log, with credentials removed.
The page keeps polling while a run is going. If you reload it, it returns to the run. If it loses contact with the installer, it says “Lost contact with the installer. It may still be running — reload this page.”
If a run stops, the panel says where (“Stopped at: …”) and what to do next:
- If some steps were completed: “Your progress is saved. Resume when you are ready.” Choose Resume. Completed steps are not repeated.
- If nothing was created: “Nothing was created. Install again when you are ready.” Choose Install.
A run that ends with work still left (exit code 4, incomplete) is reported as “Not finished” and not as a success. Check the log, fix what it names, and resume.
When it finishes
Section titled “When it finishes”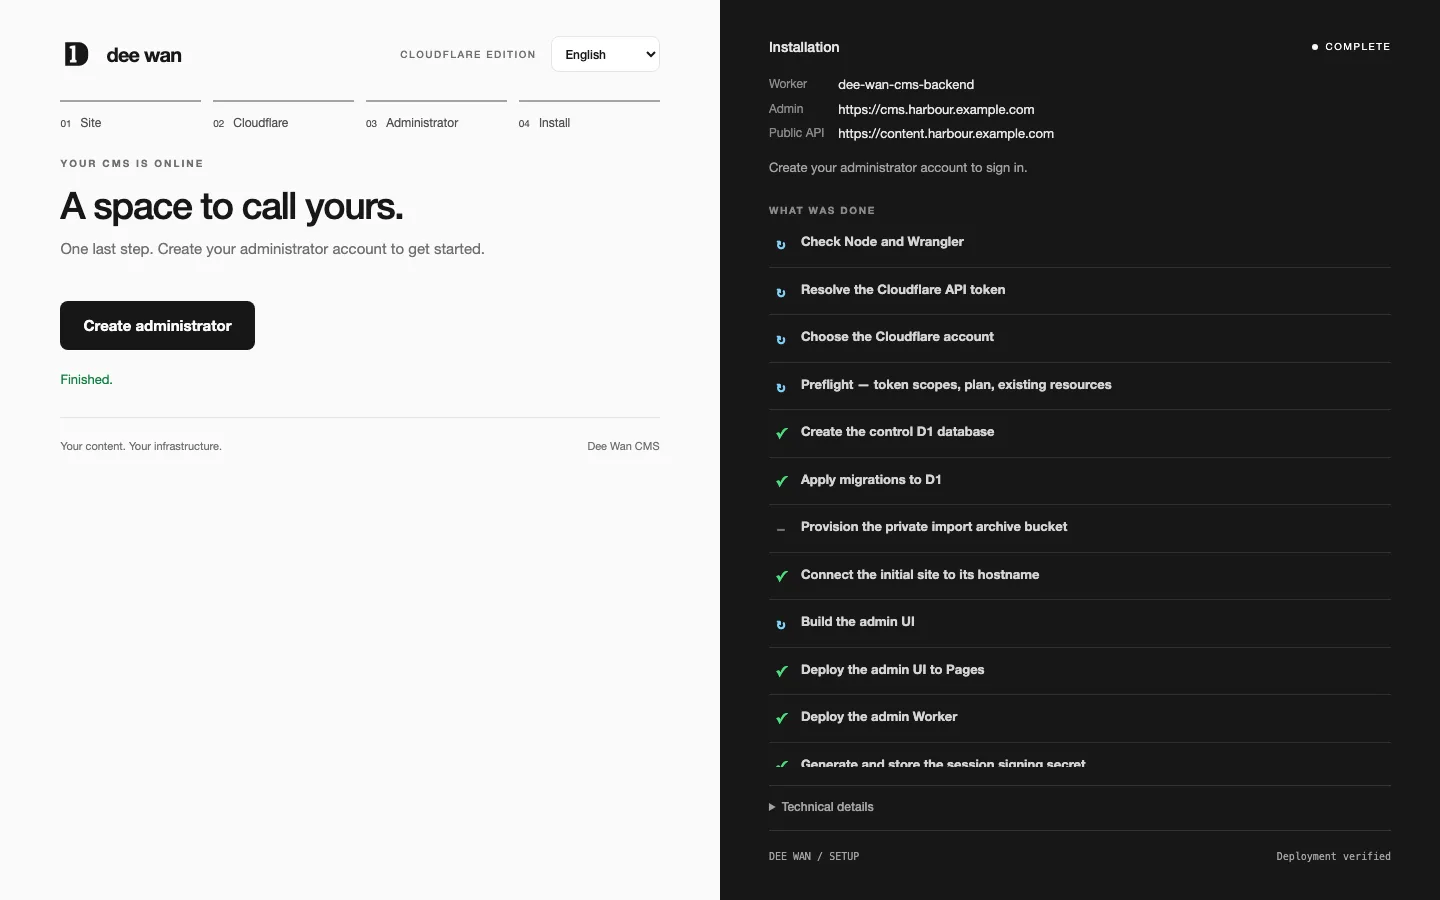
The panel lists the Worker, the admin address and the public API address that answered, and the page shows Create administrator. It opens the claim link in a new tab, where you set your password. See Claim the installation.
The claim link is never shown in the log. The page offers it through that button, only while the link is valid, and only once.
Preview the wizard without touching Cloudflare
Section titled “Preview the wizard without touching Cloudflare”npm run install:web:dry-runThis serves the same page for review, with every external effect replaced. The configuration and
ledger live in a temporary folder that is removed on Ctrl-C, account discovery and the install run
are scripted, and nothing reaches Cloudflare. It listens on port 8978 unless DEEWAN_INSTALL_PORT
is set. Sign-in completes when you open the sign-in link printed at start; do not press
Authorise Cloudflare, which opens Cloudflare with a placeholder client id.
Command-line installer
Section titled “Command-line installer”Credentials
Section titled “Credentials”The command-line installer needs a Cloudflare API token. npm run setup prompts for one if none is
set, and prints the permissions with a reason for each, plus a link to Cloudflare’s token editor
that pre-selects them. It also tells you to include all accounts and zones.
| Permission | Why |
|---|---|
| Account · Account Settings · Read | Find the account the resources belong to. |
| Account · D1 · Edit | Create the database and apply migrations. |
| Account · Workers Scripts · Edit | Deploy the API Worker. |
| Account · Cloudflare Pages · Edit | Create and deploy the admin UI project. |
| Account · Workers R2 Storage · Edit | Create the media bucket. |
| Account · Access: Service Tokens · Edit | Issue the service token the Workers use. |
| Account · Zero Trust · Edit | Create the Access application that guards the admin. |
| Zone · Zone · Read | Resolve the zone your domain belongs to. |
| Zone · DNS · Edit | Point the hostname at the Worker. |
| Zone · Workers Routes · Edit | Route the hostname to the Worker. |
| User · API Tokens · Edit | Verify the token itself. |
| Zone · WAF · Edit (optional) | Install the auth and optional public API rate-limit rules. |
npm run doctor prints the same list when the token is missing or lacks a permission. Both come
from scripts/cloudflare-token-scopes.ts, so a token built from what doctor asks for is one
setup accepts. If you use Cloudflare Images, setup recommends a separate token with only the
Cloudflare Images: Edit permission.
To skip the prompts, set the token and account in the environment:
export CLOUDFLARE_API_TOKEN=… # skips the token promptexport CLOUDFLARE_ACCOUNT_ID=… # skips the account pickerCredentials are resolved in this order: a variable exported in your shell, then the repository’s
.env file, then values in backend/wrangler.jsonc. When the environment overrides a different
value in the config, the installer says so.
The token is checked before anything is created. An interactive run allows three attempts; a non-interactive run stops at the first failure. Either way, a token that cannot be verified means no Cloudflare resources are created.
Application secrets are never stored in wrangler.jsonc. See Secrets.
Interactive install: npm run setup
Section titled “Interactive install: npm run setup”npm run setupsetup walks through the installation and saves each answer to backend/wrangler.jsonc as it
goes, so a second run does not ask again. In order, it:
- Finds or creates
backend/wrangler.jsoncand resolves the token and account. If the token reaches several accounts, it asks which one to use. - Asks which D1 plan the account is on (Free, 500 MB per database; Paid, 10 GB per database).
- Runs preflight and prints a report. If a check fails, it stops before creating anything (“Setup stopped before creating any Cloudflare resources. Fix the FAIL rows above.”). If resources will be created or modified, it asks you to confirm.
- Asks where the installation will live (your own domain, or the addresses Cloudflare provides),
then the domain, the admin subdomain (default
cms) and the public content API subdomain (defaultcontent). - Asks whether to set up DNS, whether to set up Cloudflare Access (default no), and whether to install a rate-limiting rule on the public API (default no).
- Asks for the Pages project name and the Worker name.
- Asks for the storage provider, Cloudflare R2 or Cloudflare Images. For R2 it creates the
bucket (default
dee-wan-cms-images), enables public access through the managedr2.devaddress or a custom media domain, and checks that uploaded files are actually served. - Asks whether to enable data import, which creates a private R2 bucket for uploaded archives (default no).
- Creates the D1 database and offers to apply the schema (default yes). A fresh install needs no separate migrate step.
- Builds and deploys the admin UI, the admin Worker and the public read Worker, stores the
Worker secrets, and attaches the route, DNS records and Access application you chose. It
writes
backend/wrangler.public.jsonconce the account, zone and database id are settled, and never overwrites an existing one. - Offers to run health checks.
- Asks for the first administrator’s email, if
BOOTSTRAP_ADMIN_EMAILis not already set, and prints the claim link.
It ends with “Setup complete!”, a configuration summary and the next steps. If a required part is missing, it ends with “Setup did not complete” and names what is missing instead.
setup also accepts --access / --no-access and --public-rate-limit /
--no-public-rate-limit to answer those questions on the command line, for example
npm run setup -- --no-access.
Plan first: npm run plan
Section titled “Plan first: npm run plan”npm run plannpm run plan -- --jsonplan prints every step an installation would perform and the state each one is already in. It
works only from the configuration and ledger on disk: it touches no network, creates nothing and
costs nothing. --json prints a machine-readable plan with a planVersion.
Each step has one of these states:
| Mark | State | Meaning |
|---|---|---|
✓ |
done | Recorded as completed. |
• |
to do | Will run. |
– |
not applicable | Skipped for this configuration, with the reason. |
✗ |
blocked | Cannot run yet, for example because no Cloudflare API token was found. |
? |
unresolved | A previous run asked for this and never recorded an answer, or it failed. apply checks the account before repeating it, and refuses rather than guesses. |
↻ |
re-checked | A check that runs on every apply. |
The installer verbs: npm run install:cms
Section titled “The installer verbs: npm run install:cms”npm run install:cms -- <verb> [options]| Verb | What it does | Changes the account |
|---|---|---|
plan |
Says what an install would do. The same as npm run plan. |
No |
apply |
Runs the install. | Yes, creates billable resources |
resume |
Continues an install that stopped part-way. Refuses if no step has been completed yet. | Yes, creates billable resources |
doctor |
Preflight checks. Changes nothing. | No |
verify |
Drives a deployment end to end. Never point it at production; add --read-only there. |
Creates a site, a model and content, unless --read-only |
teardown |
Removes what the install created. A dry run unless --apply is passed. |
Only with --apply |
manifest |
Prints a redacted record of the install (account, resource names, step history) for handing it over. It never contains a credential. | No |
apply and resume run the same engine as npm run setup. The step ledger is what makes a
second run continue rather than repeat: each completed step is recorded in a ledger file in the
repository root, one file per Cloudflare account (.dee-wan-cms-install.<account>.json). A
ledger file that cannot be read completely stops the run instead of being ignored.
Options:
| Option | Meaning |
|---|---|
--config <file> |
Which installation to act on. Default wrangler.jsonc; a bare name is looked up in backend/. |
--account <id> |
The Cloudflare account to target, explicitly. Every step the verb runs is pinned to it. |
--json |
Machine-readable output. Implies --yes. |
--yes, -y |
Never prompt; fail instead of asking. |
verify also forwards --read-only, --public, --admin, --email, --model and
--disposable, and teardown forwards --apply and --yes. Any other option, a repeated option,
or an option given with an empty value (such as --account= from an unset shell variable) is
refused, not ignored.
apply, resume, teardown and verify (unless --read-only) need an account. They take it
from --account, then CLOUDFLARE_ACCOUNT_ID, then account_id in the config, and refuse if
none is named.
Exit codes
Section titled “Exit codes”install:cms exits with a fixed code, so a script can branch on the result:
| Code | Name | Meaning | What to do |
|---|---|---|---|
| 0 | ok | The install is complete. | Nothing. |
| 1 | usage | The command line was wrong, or resume found nothing to resume. |
Fix the command. |
| 2 | blocked | Something only you can supply is missing, such as a token or an account. | Supply it, then run again. |
| 3 | failed | The run broke. | Read the output and fix the cause before repeating. |
| 4 | incomplete | The run did not break, but work is left. | Safe to retry as it is, usually with resume. |
| 5 | unresolved | A step was started and its outcome is unknown. | Look at the account before repeating anything. |
plan uses the same codes to describe the current state: 2 when a step is blocked, 5 when one is
unresolved, 4 when work is left, and 0 when everything is done.
Running unattended
Section titled “Running unattended”With --yes, --json, DEEWAN_YES=1 or CI=true, every prompt takes its default. A question
with no safe default is an error that names the setting to add, instead of a guess:
- Where the installation lives: set
"DOMAIN_MODE": "custom"with"DOMAIN", or"DOMAIN_MODE": "cloudflare", undervarsinbackend/wrangler.jsonc. - The D1 plan: set
"D1_PLAN": "free"or"paid"undervars, or exportD1_PLAN. - The account, when the token reaches several: set
account_idin the config or exportCLOUDFLARE_ACCOUNT_ID. - The first administrator: set
BOOTSTRAP_ADMIN_EMAILundervars. An unattended run does not ask for it, and without it no claim link can be minted.
For example:
npm run install:cms -- apply --account <account-id> --jsonSharing a Cloudflare account
Section titled “Sharing a Cloudflare account”The default resource names (dee-wan-cms-backend, dee-wan-cms-db and so on) are fixed, so two
installations in one Cloudflare account collide. Set DEEWAN_RESOURCE_PREFIX to namespace every
resource a run provisions:
DEEWAN_RESOURCE_PREFIX=test-a1b2 npm run setup # creates test-a1b2-dee-wan-cms-db, …DEEWAN_RESOURCE_PREFIX=test-a1b2 npm run teardown # dry run; only touches test-a1b2-*The prefix must be lowercase letters, digits and dashes, start with a letter or digit, and be at
most 24 characters. With it set, teardown skips and reports any resource whose name does not
carry it.
Set it for a fresh installation, not an existing one. Wrangler finds the D1 database by the name in
backend/wrangler.jsonc, so the prefix only works once setup has written the prefixed names into
that file. See Running the installer against a shared account.
After installing
Section titled “After installing”Claim the installation
Section titled “Claim the installation”Nobody has an account until the installation is claimed. The installer mints a single-use claim link bound to the administrator email:
- the web installer offers it through Create administrator;
npm run setupprints it once, with the address it belongs to and when it expires.
Open it and set a password of at least 12 characters. That creates the superadmin, and you are signed in. The link expires after 15 minutes and is shown exactly once; only its hash is stored, so it cannot be printed again.
If the link expires before anyone uses it, run the installer again (Resume in the web
installer, npm run install:cms -- resume, or npm run setup). An expired claim link counts as not
done, so the run mints a new one as long as the installation has not been claimed.
npm run claim:link -- --remote --email <address> is the break-glass path for later: it mints a
password link only for the sole active superadmin. It cannot create the first administrator. See
Signing in, and getting back in.
Verify it works
Section titled “Verify it works”npm run healthruns post-deploy checks against the deployed addresses. With Access enabled, it also checks the perimeter.npm run verify -- --read-only --public <public-api-url>checks a deployment without writing anything. Add--model <slug>to read one published model.npm run verifywithout--read-onlycreates a site, a model and content. Use it only on a disposable deployment.npm run doctoris a read-only preflight that names anything missing and how to fix it.npm run planshould report nothing left to do.
Add secrets for optional features
Section titled “Add secrets for optional features”Secrets are set with wrangler secret put from the backend/ directory, never in a file. For
example, the AI features need a DeepInfra key:
npx wrangler secret put DEEPINFRA_API_KEYSee Secrets for the full list.
Deploy updates and apply migrations
Section titled “Deploy updates and apply migrations”The installer deploys everything once. After you change code or configuration, deploy again:
npm run deploy # admin Worker, admin UI and the public read Workernpm run healthdeploy refuses to run without backend/wrangler.public.jsonc. An installation that deliberately
serves no public content deploys with npm run deploy -- --admin-only. See
Deploy.
When a later release adds database migrations, apply them with npm run migrate:d1. See
Database migrations.
Starting over or tearing down
Section titled “Starting over or tearing down”npm run teardown removes the resources named in an installation’s config: Workers, the Pages
project, D1 databases, R2 buckets, the Access application and DNS records. It is a dry run unless
you pass --apply.
npm run teardown -- --config backend/wrangler.jsonc # list what would be deletednpm run teardown -- --config backend/wrangler.jsonc --apply # delete it- Without
--config,teardownrefuses unlessDEEWAN_RESOURCE_PREFIXis set, so it never targets the default installation by accident. - Every resource is listed before anything is deleted. Resources that exist but are not named in the config are reported and skipped.
- Before deleting D1 databases it offers to export each one to a local
.sqlfile (default yes). If an export you asked for fails, nothing is deleted. - To confirm, you type the Cloudflare account name.
- Unattended (
--yesorCI=true), you must pass--export-dir <directory>or--skip-export, and--confirm-account <name>. - Afterwards,
backend/wrangler.jsoncstill holds the old identifiers. Delete it before reinstalling.
npm run install:cms -- teardown runs the same script for the chosen config and account, and
forwards only --apply and --yes. For the unattended options above, run npm run teardown
directly.
Troubleshooting
Section titled “Troubleshooting”Start with npm run doctor and npm run plan. doctor names what is missing and how to fix
it. plan shows which step is done, left, blocked or unresolved, without touching the network.
The web installer says the port is in use. Another process, often a second installer, is
listening on the port. Close it, or set DEEWAN_INSTALL_PORT to a free port. Nothing was created
in any account. If you use a Cloudflare OAuth application, its registered redirect address must
match the new port.
The page says “This installer is bound to one session.” Open the exact link printed in the terminal. A restarted installer prints a new link.
The Cloudflare step says “Cloudflare sign-in needs setup.” This build has no Cloudflare OAuth
application (DEEWAN_CF_OAUTH_CLIENT_ID is not set). Use the command-line installer with an API
token.
The web installer cannot read or edit the configuration. It edits only wrangler.jsonc. Fix
backend/wrangler.jsonc if it is malformed, or convert a wrangler.toml to wrangler.jsonc, then
reload the page.
A run stopped part-way. Resume it: Resume in the web installer, or
npm run install:cms -- resume. Completed steps are not repeated. resume refuses when nothing has
been completed yet; use apply then.
Exit code 4 (incomplete). The run did not break and it is safe to retry as it is. Read the output for what was left, usually something to fix at Cloudflare, then resume.
Exit code 3 (failed). Read the output, fix the cause, then run again.
Exit code 5, or a step marked ? (unresolved). A previous run asked Cloudflare for something
and never recorded the answer, or it failed. The installer checks the account before repeating the
step, and refuses if it cannot tell. Look at the named resource in your Cloudflare account, resolve
it, then run again.
Preflight fails. setup stops before creating anything. Fix the rows marked FAIL in the report
and run again.
The token cannot be verified. Check its permissions, its expiry, and that it covers the account. Nothing is created until it verifies.
An unattended run stops with a missing answer. The message names the setting to add to
backend/wrangler.jsonc (or the environment variable to export). Add it and run again. See
Running unattended.
“Setup did not complete: this deployment has no way in.” No claim link could be minted, or the
session signing secret is not installed. Set BOOTSTRAP_ADMIN_EMAIL under vars in
backend/wrangler.jsonc (exactly one address), fix any cause the output names, and run setup
again.
The claim link expired. Run the installer again to mint a new one. See Claim the installation.